Showing posts with label refinish. Show all posts

Friday, December 2, 2011

Operation Buffet: Complete!

Holy buckets, can you guys believe it's already December?! Depending on where you live, you might be thinking the same thing I am - it's been way too warm to feel like winter is coming! This week alone we had two days in the upper 60's and two more in the 50's. Today is actually a little cooler at a rough 47 degrees. I'm not sure what to make of it all, but I'm hoping that whenever winter does get here, it doesn't come with a vengeance. Unless there's snow ... lots and lots of snow ... enough snow to close down the city. I could deal with that.

Oh, you didn't come here to read about the weather?

Silly me.

I guess you were hoping to see some pictures of the buffet.


And you're probably hoping to hear why it took me so long to finish it.
{spoiler alert: I have no good excuses, except that I like to drag out projects until Jesse starts getting gray hairs ... and let's just say he's got a few floating around on his head}

You might also be a little curious about the little details ...


Oooo-ooooo-oooohh


aaaa-aa-aawwww


Alright, I'll quit teasing. Let's get to the meat and potatoes of this post!

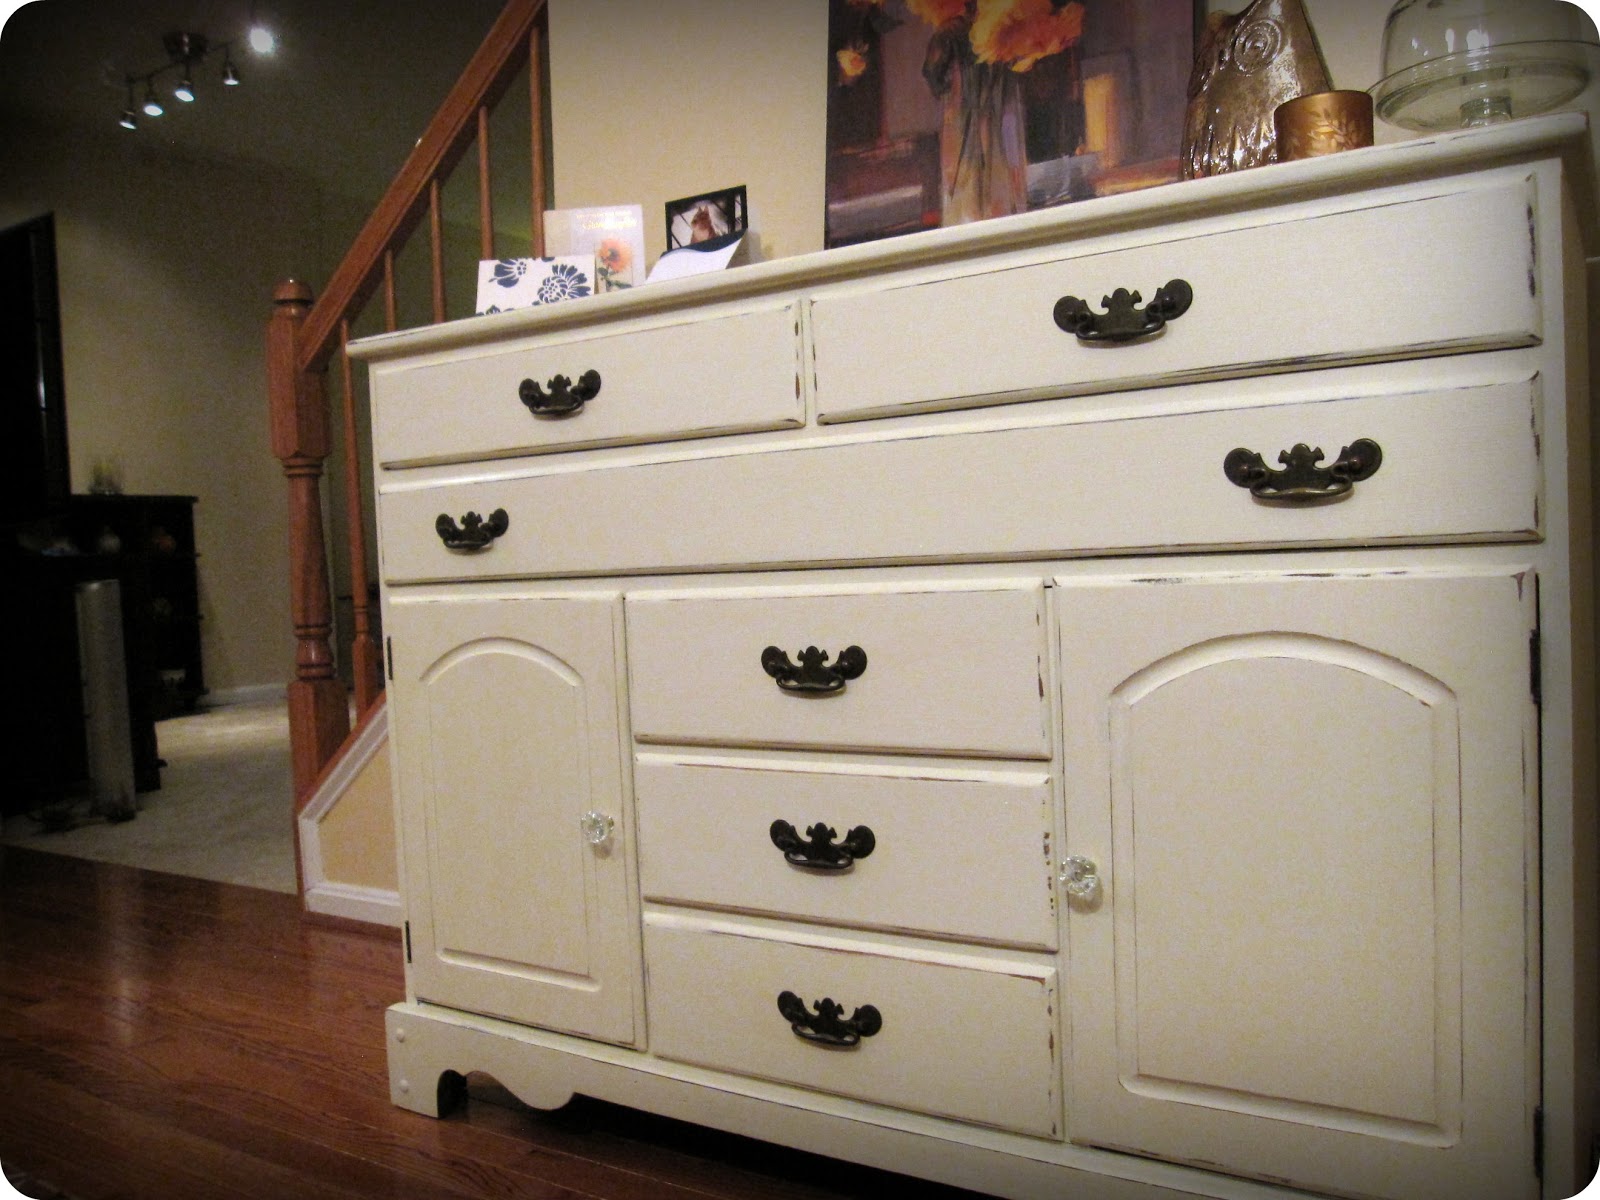
To get started, let's take a quick look back at the buffet from when I first brought it home. It wasn't in horrible shape, but there were a lot of scratches across the top, as well as a few nicks around the drawers and doors. I also didn't like the color of the wood next to everything else in our dining room.

{Here's the story of how I found the buffet ... 8 months ago}

I actually finished the buffet in November October September, but I wanted to get it into the dining room and do a little decorating before the big reveal. And, while decorating was my first priority, filling it with our stuff seemed to be Jesse's. So, before I could start buying cutesy little owls and stealing pictures off of other walls in my house, I had to do some reorganizing in the kitchen and drawer/cabinet filling in the buffet.

But alas, I finally finished everything on the to-do list, and after three more weeks of delaying, here are the final results!


Are you curious about what's sitting up on top? I hope so, because I'm about to tell you.


Starting from the left, I have a few Halloween/thank you/birthday cards that we received last month, a picture that I bought from Target a few years ago (it was previously hanging in the upstairs hallway), an owl that I just picked up at TJ Maxx, a pumpkin spice candle, and a miniature cake pedestal that we got as a wedding gift. I also laid down two place mats to act as a runner until I find something more permanent.


Enough of the close-ups, let me show you how the buffet looks next to the table. It seems to blend perfectly with everything in the room.


I couldn't zoom out enough to fit the entire dining room in these pictures, but I hope you get the idea.
{note to self: add fancy-schmancy camera to the Christmas list}


Thanks to everyone who voted when I couldn't decide what to do, and thank you for sticking around long enough to see the big reveal. I know eight months is much longer than it should have taken, but I think my next project will be much quicker, especially now that I've got this one under my belt.


P.S. I already started typing up my thoughts/opinions about the products I used for this project, as well as a few tips that might be helpful for other newbie painters, all of which I'm planning to post before I lose momentum.

Warning: I have my birthday party, Jesse's soccer game, a birthday dinner for a friend, and a few dozen cookies to make this weekend {I'm hosting a cookie exchange party for a bunch of my girlfriends next weekend!}. Oh, and I also want to put up our Christmas decorations ASAP. And did I mention that my VERY best friend is coming in town on Friday? In other words, it might be a little hectic at my casa for the next week. Either way, I'm determined to keep up with this dang blog, so I will do my best to come back with Part Two very soon! Promise.

P.S.S. You can read more about the infamous buffet here, here, here and here.

P.S.S.S. Isn't this owl the cutest thing you've ever seen?? I carried it around TJ Maxx for about 30 minutes, trying to decide if I should buy it or not. At just $12, I don't know why I was ever wavering!


Have a good weekend and I'll talk to you next week!!

P.S. This post is linked up to

Furniture Feature Fridays

Wednesday, May 4, 2011

It's Mine ... All Mine!

This is exactly what it looks like - my new bookshelf!


Isn't she gorgeous?


Want to know my favorite part? The braided detail and the curved feet!


Even the shelves have some curve ...


And the worst part?

The fact that I can't do anything until I finish the buffet!

But a girl can dream ...

So let's dream for a moment, shall we ....

I'm envisioning a light color - gray, white or light blue?

{source}

And some distressing. Yes, definitely some distressing!

{source}

And then plenty of pictures and goodies to fill the space.

{source}

I can't wait!

{See how I got my new bookshelf in this post from yesterday}


Thanks to those of you visiting from Miss Mustard Seed's Furniture Feature Friday! If you have any recommendations/requests about what I should do with this bookshelf, I'd love to hear about it. Leave me a comment below with your great ideas! :)

Furniture Feature Fridays

Tuesday, May 3, 2011

Craigslist Find #2: Bookshelves and Side Tables

As I was doing my daily Craigslist perusal yesterday (you can read about my CL obsession here), I came across a little gem. There are actually two gems, but my amount-of-time-available-to-work-on-projects budget can only afford one, so I had to decide which one I needed more.

Side Table ($25) or Bookshelf ($35)

{source}

I really love both pieces, but since I just got done refinishing the side table for our living room, I decided the bookshelf was higher on my priority list. I have a few places in our house where I'd like to put a shelving unit - the living room, our bedroom, the craft room - so I have no worries about finding a permanent home for it, once assuming I get it. I'm supposed to go look/pick it up tonight, so I'll let you know what happens!

P.S. I really do love that side table, but I can't get too far ahead of myself. I still have a buffet to work on, and I won't be able to start that until the end of the month. Traveling for work is fun ... NOT! :)

Monday, May 2, 2011

Prepping for the Prep Work

I'd be lying if I said I wasn't scared to tackle the buffet. In fact, I'm so scared that I'm going to mess something up, I decided that I needed a pre-buffet project. Hence the title, Prepping for the Prep Work. Before going all out with the sanding, priming, painting and staining, I wanted to make sure that I knew what I was in for. In other words, I'm procrastinating (at least that's what my husband thinks).

So this weekend I set out to the local thrift store with the hopes of finding something cheap.


There were plenty of solid wood pieces, but most of them were at least $80. 
Not quite what I had in mind for a trial project.

As I did my final loop around, I noticed a cute little side table tucked underneath a shelf. It was solid wood (check), in great shape (check), and it was only $14 (check).


After I loaded the little table into the car, I stopped by Home Depot to pick up my supplies.


I spent the rest of the afternoon sanding ...


taping ...


priming ...


painting ...


And painting again ...


I let the paint dry overnight (and through most of Sunday afternoon) before I tackled staining.

For the staining process, I brushed on a wood conditioner (thanks for the tip, Cassie!) ...


waited 15 minutes before brushing on the stain ...


Waited another 15 minutes, and then wiped off the stain to reveal this ...


I'm pretty much in love with it ...


So there you have it. I was able to practice each step without risking a casualty at the expense of the buffet. I learned several lessons along the way and ended up with a finished piece of furniture. Alright, it's almost finished ... I still need to spray it with the Polycrylic tonight.

Once I'm all done, I'll share some of the lessons I learned, along with a few more pictures.

Next up, the buffet!

Bring. It. On.


This project is linked up to Thrifty Decor Chick's Before and After Party, Primitive & Proper's Piece of Work Wednesday (POWW), and Miss Mustard Seed's Furniture Feature Friday:


Furniture Feature Fridays

Tuesday, April 26, 2011

Spring Cleaning, Easter Weekend and the Buffet ...


This weekend turned out to be productive ... really productive. I cleaned out my dresser, packed up my winter clothes, cleaned out our "junk" closet, spent an entire afternoon with friends - drinking beer, watching hockey and eating pizza, made deviled eggs, deviled ham and turkey burgers, hosted an Easter egg hunt for Jesse and Drew, AND started working on the buffet!

I thought about sharing all of the nitty-gritty about my spring cleaning and giving you the recipe for the deviled eggs I made on Easter, but I know that everyone's probably more curious about the status of the buffet. {Check out my first buffet post here and the "voting" results here} So without further ado, here's the progress I made this weekend.

But first, one last before picture. From here on out I'll be posting pictures of my progress, and then the final product!


Here's what I accomplished this weekend:

1. I decided how I want to refinish it.
2. I bought sandpaper (80, 150 and 220 grit - I wasn't sure what I really needed).
3. Drew dropped off his dad's power sander (again, not sure if I need it, but it's here just in case).
4. I removed the hardware from the left door.
5. I got so impatient removing hardware that I decided to start sanding ... by hand!

What, you're not impressed? I'll admit, it doesn't sound like much. But here's the thing, I'm trying not to rush into anything and mess it up. Plus, this is the first piece of furniture I've ever redone, so I want to make sure that I don't wear myself out before I finish it. And according to my loving husband, he isn't expecting it to be finished until at least our 10th wedding anniversary, so I've got plenty of time to make it perfect. :)

#1 - Refinishing Plan
After reading a lot of blogs, talking to several family members and really thinking about what I want to bring into the dining room, I've decided to go with an ivory paint on the body of the buffet, with an olive green/black glaze and distressed finish. At this point, I think I want to stain the top of it, to play off the wood furniture, but I'll see how the sanding goes. I'm not sure if I want to stain it to match the table (dark wood) or the chairs (medium honey), but I still have a little more time before I have to make that decision. Here are a few newer inspirational pictures that I've been ooh-ing and ahh-ing about.

{source}


{source}

I love the coffee table, but I probably won't distress the buffet quite as much. As for the dresser, I like the glazing that she did, along with the hardware. The squid doesn't quite fit with my decor, but to each their own.

#2 - Sandpaper
Here is the sandpaper that I bought:


The guy I bought the buffet from taught me that the lower the grit, the rougher the sandpaper. He also said that I should start with the lowest grit for the first round of sanding and then use a higher grit for each additional round of sanding. I am using the 80-grit to do my initial sanding, which should remove the glossy finish from the wood. Prior to priming, I will probably quickly go over it with the 150-grit to make sure there aren't any rough patches. And after priming, I'll use the 220 to smooth it out before painting. I'm not sure if I need all three steps, so if anyone has any insight, I'd love to hear it!

#3 - Power Sander
Drew found out that his dad has a power sander, so he picked it up for me this weekend. After talking to my mother-in-law about the quality of the wood, I'm a little nervous to use the power sander on this piece. Not only have I never used a power sander, but the wood is in really good condition, so I don't want to do any damage to it. Again, any tips or pointers?

#4 - Prepping
I decided to start sanding the doors first because I'm still thinking about cutting out the center of them to add glass. I figured if I mess them up, it doesn't really matter because it'd be a good excuse to justify the glass! I removed the first door from the buffet, which took a little longer than I expected. It doesn't look like the screws have been removed since it was built, so it was hard to get them off. I still need to work my way around the rest of the buffet to remove all of the hardware, but last night I just wanted to test out the sand paper and get a feel for the road ahead.


#5 - Sanding
Which brings me to sanding. I started sanding last night, but only made it through the first door before we had to leave for Jesse's soccer game. I knew I only had a little bit of time, so I thought it would be a good chance to try my hand at sanding - literally.

I think it went alright, but I'm feeling anxious about how much I took off. My mom said that if I'm going to paint it, then I don't need to sand it down all the way to the wood - just enough to remove the glossy finish. I tried not to press too hard, but I also didn't want to create an uneven texture by not sanding enough. I'm a little worried that I over-sanded, but nothing I can do about it now.


Does this look like a light sanding, or did I do too much? If I did too much am I stuck sanding this much for the whole piece? I don't want to do more work than necessary, but I also really want to make sure that I end up with a nice piece of furniture. These are the questions looming in my head, making me wonder if I'm making more work for myself than necessary.

After thinking about the buffet through most of Jesse's game, I decided to come home and check out a few of my go-to furniture blogs {All Things Thrifty, Twice Lovely and Primitive & Proper}, to see if I could find any tips. Here's the problem, I got too impatient and it was late. One post talked about how to prep, but as far as sanding goes, it just said to "lightly sand" - ugh, that's what my mom said too. Can I get a picture of what "lightly sand" means? I knew that all of those blogs had better descriptions/how-to's/tutorials on their sites somewhere, but it was close to 1:00 in the morning, which was WAY past my bedtime. I decided to call it a night and try again today.

Imagine my surprise when I logged into my Google Reader today and saw that Kate from Centsational Girl had a whole post dedicated to painting wood furniture! It's almost as if she knew that I was going to struggle with this project. While she didn't post any pictures of "lightly sanded" furniture, she did have plenty of useful tips about sanding, repairing/patching wood, priming (that will be my next step), and of course, painting. Her post is just what I needed to regain my momentum! One thing I realized is that I probably need to buy a sanding wedge if I am going to keep working by hand. I should also probably hit up a paint store to see if I can find a few of the products that she recommends.

Before I start sanding again, can anyone give me any insight about where to go from here? Should I keep sanding at the level I have been or should I lighten up for the rest of the piece?

As soon as I figure out this sanding conundrum, I'll be back with more pictures and details about the next step!

Wednesday, March 30, 2011

Survey Says (drum roll please) ......

Note: For the sake of this post, we're going to pretend that I got 600 votes in my buffet survey instead of just 6. Now don't get me wrong, I'm actually really thrilled that I got as many comments as I did (even if I did have to harass a few people), and even more thrilled to see that a few fellow bloggers took the time to check me out! So here we go ....

Ok, I was really hoping for blow-out results. Like the type of results you see on People's Fashion Faceoff  when the answer is SO obvious:

Kate, don't you know the neutral rule? You need at least one pop of color.
(and the black tips on your shoes don't cut it)
Monica clearly takes the cake on this one - way to keep it classy!

Anyway, back to the subject at hand ... I was hoping for blow-out results so that I wouldn't have to make a decision. You see, I've been struggling to narrow down my options, and I keep going back and forth on my favorites.

It looks like your top contenders are the dark/white combination, antique white and antique color. Lucky for me, those were my top three choices to start with. It looks like I'm on the right track. Unlucky for me, this doesn't exactly help me narrow it down. I'm really leaning towards a dark/light combination, but I'm not sure if that combo will be white or another color ... decisions, decisions!

I still have a few weeks to decide, so I'll probably do a little more research to figure out which method will be the easiest. I might even do some more digging around the ole' internet to see if inspiration strikes. Here's a little inspiration that I found last night ...

source

I love how the wood on the table matches the wood top on the china cabinet, but they mixed it up by painting the chairs white and the cabinet gray. I really must be leaning towards the dark/light combo.

But before I can even start this project, I sort of need to acquire a sander. (That's right, I don't own any of the necessary tools to start this project.) I've asked a few friends, but so far I'm coming up empty-handed (literally!).  I do have one promising option, which is Drew's parents, but I'll have to wait and see if they have one.

If not, it's off to Home Depot I go, which means I have some research to do. Thank God for the Internet!

source

I glanced at HD's website and was pleasantly surprised to find out that I can get one for under $50. I figured I would have to invest a ton of money, but I can deal with $50. The one above is the first one I saw on their website, so it's not necessarily something I'm looking at. Does anyone have any recommendations?

Well I'm off to go watch Jesse play in his first soccer game since the ACL tear and repair - wish him luck! And wish my hair luck because it's raining out there!


Monday, March 28, 2011

Craigslist Find of the Year

Oh Craig, you are such a good friend. You're such a giving guy, never short of new adventures. I can spend hours with you, moving from topic-to-topic; anything from chairs to coffee tables and jobs to sporting events. And for the past year, we've been talking about one topic, in particular, an awful lot. For awhile there I thought you weren't listening to me. I would talk about my need for a solid wood buffet, with both drawers and cabinets to ensure I have enough space. I also talked to you about size, but all you wanted to offer were either small cabinets or oversized china cabinets. Until last week. Last week was a turning point in our friendship. Last week you gave me this. Craig, I think you just became my best friend (sorry Kelly!).


Alright, enough about Craig. Here's how everything went down.

Early last week I came across this buffet in my daily Craigslist scour. Solid wood? Check. Drawers and cabinets? Check. Less than 55" long? Check. And no significant damage? Check Again. Could it be that I finally found my buffet? After running through my mental checklist, I emailed the seller right away and told him that I was interested in buying this beauty. I didn't hear back for a few days, and quite frankly I figured it had already been swiped, so I kind of forgot about it. Then on Friday of last week, he emailed to tell me that I could call him over the weekend to arrange a time to go see it. I was running out of work when I saw his email and didn't pay much attention.

So Friday night came and went, and I went out shopping on Saturday without thinking about the email all day. Finally, on the way home from girl's day, Meredith and I were talking about how I still needed a buffet. I was explaining one that I had been eyeing at Pottery Barn, but knew I could never afford ...


... when it dawned on me that I never responded to the Craigslist email. How could I have forgotten!? I called the number from the ad right away. The guy gave me his address (which happened to be just down the street from me!) and said that I could come by that night to see it. This was sounding very promising!

Meredith dropped me off and I had an hour to kill before I could go see my buffet. I spent that time explaining to Jesse (and the other guys) that I was going to look at a buffet that I had every intention of buying. Either Jesse was distracted by all of the testosterone or he actually realized how long I've been looking and how badly I've wanted to find a buffet because he just sort of went with everything, without asking too many questions. I then asked Drew if I could borrow his Forerunner, in case I decided to buy it, and ran out the door.

(I'll abbreviate this next part) I went over there, fell in love, realized it was WAY too heavy to carry up the stairs without more help, called Jesse and Drew to be my sherpas, lugged it out of the house watched Jesse and Drew lug it out of the house (while the seller told me everything I need to know about staining and painting wood furniture). Then we drove it home and plopped it in our dining room basement.

And here it is in all it's glory ...


Wanna know my favorite part? Probably that full-length drawer. That or the curves on the bottom. But I also like those little doors! Ok, I love it all!

I really wanted to bring it right up to the dining room, but it weighed at least 150 lbs. and I couldn't imagine asking the guys to drag it all the way upstairs to drag it back down to my garage in a few weeks, which is where I'm planning to refinish it.

I've never really painted or stained furniture before, but I've been itching to refinish something of my own for awhile now. It will probably be a slow process, with lots of learning along the way, but I'm excited to take it on!

Since it'll be a few weeks before I can touch it (I'll be away the next two weekends), let me leave you with a few ideas that have been swirling around. Ooh, and if you are one of the few people that read the blog, will you do me a favor and vote on one? I'm pretty sure only about 4 or 5 people read on a regular basis, but I'd love to hear from you!!

A. Stained Wood

source

I played with the lighting of my original picture
to make my buffet a little less Cherry

B. Dark/Light Combination

source

source

C. Antique White

source

D. White Stenciling

source

E. Antique Color

source

source

Alright, help me prove that there are at least a few people reading this and place your vote! :)